
Dot Marker Art
(E was 32 months old.)
You’ll need:
- Dot markers. {Some of these things are REALLY expensive. We got ours at Dollar Tree for $1 a piece.}
- Paper.
- Straw (optional). {Depending on your dot markers, you may or may not be able to use it.}
E wanted to paint a picture for Papa’s office, and since we’d just bought a few dot markers, she really wanted to try them out. I hadn’t really bought them with art in mind but figured why not.
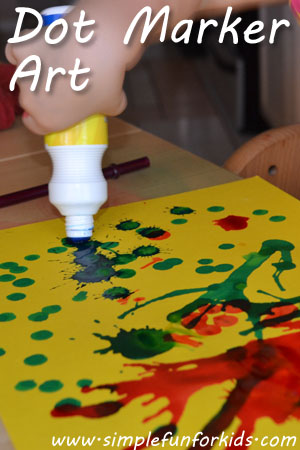
She started out making, well, dots.

But we quickly noticed that you could get a LOT of paint out of these markers if you pushed them on the paper hard enough.
So I went and got a straw and suggested that E could try some blow painting.

It wasn’t easy for E {and some spit might have reached the paper 😉 } but she really liked it and kept trying. She asked me to help a few times as well.

After a while, she went back to making dots – she even tried a two-handed technique.

And she discovered that she could make the paint spatter. That’s when I decided to put down some newspaper to protect our dining table 😉 {I could already tell that the paint stained E’s hands, and I was a bit worried for her t-shirt as well.}

To finish her dot marker picture, she used the straw some more.

And she surprised me by pointing out the difference between wet and dry paint on the paper!


Thankfully, the clean-up wasn’t as bad as I’d thought, and the paint came off E’s hands and her t-shirt just fine {I did throw her t-shirt into the washing machine right away just to be safe}, and the table came clean as well.
The next day, E wanted to paint a picture for Oma, and she wanted to use the dot markers again.
She also wanted to blow the paint again but this time, she wasn’t able to get proper paint puddles going. I guess it only worked the first few times {although I have to say, if I’d wanted to use these things for Bingo, I would’ve been annoyed to find out they were this messy…}.

Splattering still worked fine, though 🙂

And in the end, she had a wonderful work of art to send to Oma!

What I learned:
- This was an activity I didn’t expect to become this “complex”. I figured, well, she was gonna make dots {and that would’ve been a fine toddler art activity as well, of course!}.
- You may wanna do this when your kid isn’t wearing her favorite t-shirt, just to be sure… Bingo markers are probably meant to be used with more restraint 😉
Additional suggestions:
- Just let your toddler explore the markers on their own. I was probably a bit hasty when I suggested the straw.
- If your markers don’t lend themselves to blow painting, you can always use liquid water colors or mix some tempera paint with water to explore the technique.
Have you tried dot marker art and/or blow painting? Tell me about it in the comments!
If you liked this post, come follow me on Pinterest to keep up to date with all we do, and for lots of great ideas from others! Or like and drop me a line on my Facebook page, where I share my own posts and those of others every day!