

Painting with Golf Balls
(E was 2 years and 6 months old.)
This post contains affiliate links for your convenience.
Materials for Painting with Golf Balls
- Golf balls.
- Paint. {We used tempera paint.}
- Heavier paper.
- A sturdy box, box lid or similar.
E thoroughly enjoyed painting with marbles and with marbles and water beads, and I’d been looking for items for a similar painting experience.
My dad is a golfer, and he gave us a few golf balls when I told him they’d be great for painting 😉
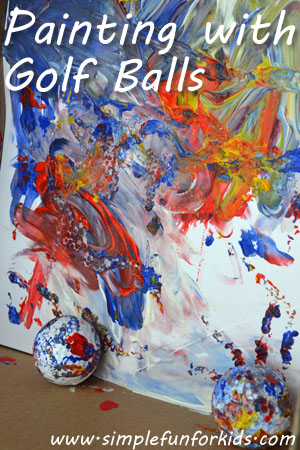
We used tempera paint, heavy paper and an old box that just fit the paper.
We took this activity outside to the balcony for no real reason except that E was already out there in her cute rubber boots. It turned out to be a good idea, as the whole thing got a bit messy.
{Not messy enough that I’d say I wouldn’t do it inside, but E did take a bath afterwards.}
E started out using a golf ball like a paint brush

before dunking it in a generous amount of paint and actually rolling it on the paper.

Apparently, it had been too much paint, and she asked for a paper towel to wipe it off.

There was much dipping of golf balls in paint and running her hands over them

and consequently whole hand and finger painting.


This was after she’d put her whole hand straight into the bowl of paint 😉

When rolling the golf balls, however, she touched them quite gingerly as if to make sure not to get her hands full of paint – or maybe not get more paint on the golf balls 😉

She never did think to pick up the box and make the golf balls roll that way as she’d done with marbles and water beads, just pushed them around with her hands.
I love the golf ball tracks and the combination with lots of sensory finger painting!

What I learned:
- An activity on the floor seems to get messier than one at the table – maybe it’s the more relaxed atmosphere?
- The dimples in the golf balls make really neat patterns.
- You’ll want to use a fairly sturdy box, maybe even a plastic one, since I can see the sides of flimsier boxes get knocked down when kids really get into rolling those golf balls.
- Our box was high enough that E never accidentally knocked the golf balls out of it.
Additional suggestions:
- Encourage your child to move the box to roll the golf balls.
- Use a higher box to drop the golf balls on the paper from different heights.
- Combine the golf balls with other items that will roll around the box.
What’s your latest unusual painting activity? Have you painted with golf balls? Leave a comment, I’d love to hear about it!
Click here to subscribe to my newsletter and receive an email twice a week with news from our house and links to all new posts! If you prefer daily updates, you have the option of subscribing to my RSS feed or my printables RSS feed on the same page.
Join me in my Facebook group where we discuss simple play ideas for young kids every day!
This looks like loads of fun…smart mommy to put it in a BOX!
Pinned it 🙂
Would LOVE it if you would stop by my Wonderful Wednesday Blog Hop on Ducks ‘n a Row to share this (and other) post(s).
Boxes are SO useful – can you believe my husband always wants to throw them out right away??! 😉 I’ll be sure to check out your blog hop – and I edited your website URL for you to make sure other people can do the same 🙂 Thanks for stopping by and for pinning!